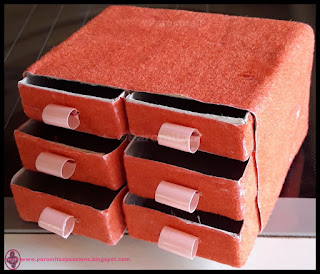
Waste Material Craft (Matchbox)
Looking for some
creative ideas for your kids. Well here is a solution to your search, where you
do not need to step out of your home, and
you can teach your child creative stuff
at home. Why not we make something out of the things lying at our home itself. Yes!
To make the best out of the waste materials.
Reusing and recycling
the waste materials with some decorative end product is a great idea which
enables the child to learn the importance of not wasting things and also it
brings out the artistic creativity of the child. Waste material art and craft
teaches us to turn the waste materials into beautiful and innovative home made
products. It keeps the child engaged in some learning activities where he is
able to enhance his psychological development.
Our primary goal is to
reduce the waste management in our society, and since every learning starts
from home, why not the first step to reduce the garbage begins from our home
itself. Though it would be a small initiative from a small family, if everyone follows it would reduce the wastes
in our surroundings, keep it clean and also it will help our child to be more
responsible to not throw things, instead use them for more innovative purposes.
In this section, we will
make something interesting out of the used Matchboxes lying at our home. Almost
all the materials can be found in our
homes that we are going to use for this activity. The end product looks
fabulously rich and is less expensive,
can also be used for good home decoration. This is a very easy activity and
kids show a lot of interest and get engrossed while doing it.
We are going to make a ‘Mini-Drawer
Dresser’ with the used Matchboxes.
Below is the activity with step by step instructions.
Materials Required:
- Match boxes ( used and emptied, 6 Nos.)
- Velvet paper / decorative paper / gift wrapping paper (27x10cms rectangular paper cutout)
- Drinking straw ( cut into 1cms)
- Thread and Needle
- Glue
- Safety Scissor/ Cutter
Method:
- Arrange all six matchboxes
in this form:
3 boxes on one side and 3 on the other side, one above the other.
- Now stick all of the 6 boxes together with glue.
- Cut small pieces of the straw to stitch them in front of the boxes with thread and needle.
- Remove the inner emptied boxes from the dresser and stitch the straws in front of the boxes with thread and needle (parents can help their little one in stitching. You can also stick some buttons instead)
- The handles of the drawer have to be very small yet it has to be sturdy and it should withstand some force when you pull it out. So sticking something with glue will not work. (I’ve used the drinking straws to make the handles).
- Cover and stick the upper portion of the dresser with the paper at first
- The back of the dresser should be wrapped in a gift wrapping form.
- Leave one side uncovered, and stick the paper around the other sides of the dresser.
this is how it looks after covering with paper
- Your tiny little
Mini-Drawer is ready to be used.
You can store all your favorite tiny things and also it can be used as a toy to be played with your little one.
Kids will love doing this activity, especially the girls who are always fascinated about their dresser as they can store all sorts of accessories such as their tiny earrings, beads, and clips etc.
Recycled crafts are a great
idea for kids and are also a valuable tool for entertainment and distracted minds. There are so many eco-friendly recycled art projects that can be made with waste
materials, these keep them busy and bring out the best
innovative work from them. Get inspired by doing craft works at home and
decorate your home.
Reference: m@debylakshmi
Paromita Pramanick ©2017. All Rights Reserved.


No comments: