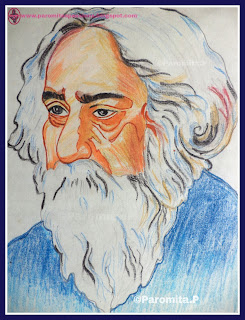
How to draw a Face
This is my tribute to this great personality- 'Rabindranath
Tagore'. He was the first Indian to win the 'Nobel Prize'. He is a great Indian
Laureate, who is still alive among us through his poems, stories, literature
and of course the 'Rabindra Sangeet', which is very famous in Bengalis. Being a
Bengali myself, I feel proud to be born in the land of poems.
We Bengalis call
him 'Kobiguru Rabindranath Thakur' and nationwide he is known as 'Gurudev'. His
Birthday is actually celebrated on ২৫ শে বৈশাখ (Pochishe Boishaakh/ 25th Boishaakh) as
'Rabindra Jayanti' in West Bengal, which is according to the Bengali Calendar
year. However according to the English calendar his birthday
actually falls either on May 8 or May 9 every year. However, in most of
the websites his birthday is given as 7th May 1861.
Rabindranath Tagore is an idol to many poets and filmmakers too,
because of him the Bengali Culture and Tradition was known to people all over
the world and it is still alive today. He has composed the National Anthem for
our Country -'Jana Gana Mana', which is actually written in Bengali and also
declared as the best song by UNESCO. Most of his stories, plays, and the
characters were from the Bengali background.
This was a small information about the Nobel man and it is my immense pleasure that I could sketch his portrait successfully.
Now I shall discuss with you how to sketch or draw a portrait of
a face. Drawing a person’s face may sound quite
difficult in the first attempt, however,
it can be a real simple method if you give your full concentration and the
process needs a lot of patience, only then you can create a portrait of a
person. It is a simple process if you approach it systematically.
You need to
keep a medium, that is the person’s photo in front of you to set an example and
medium for you to sketch at the first instance. Because drawing a portrait
without a medium would end up with an unstructured figure of the face, that is
why an example where you can observe and draw is very necessary.
The easiest way to draw a person’s face is the rough sketch of
the figure and to draft the posture of the face by looking into the person’s
face or photograph.
Materials Required:
For this activity, I've
used pencil (HB pencil will do), crayons (here I have used wax crayons/pastels), color pencils, sketch pens and of
course an eraser to overcome with any errors supposedly.
Method:
Here follows the step wise
instruction to draw a face:
- For the facial structure:
- As I have already mentioned above the first method is to lightly draw the rough sketch of the face, that is to draw the guidelines in the face.
- Start with the upper part at first that is make an oval shape for the head. Then a rough circle for the entire face, and lastly add a sharp curve at the bottom for the beard.
- Slowly bring down to the neck next, where you can draw two short, straight lines roughly ears-width apart.
- Thirdly draw a horizontal line which will be perpendicular to the base of the neck. This will be the guidelines of the figure’s collar bone.
- The features of the portrait have been figured out. Now we shall focus on the detail parts of the face.
- First, we need to draw the eyes. Eyes are the main speaking part in a portrait, therefore at first, we need to sketch the eye for detail.
- To draw the outline of the eye, start drawing the basic almond shaped structure. Make the inner corner which is next to the nose lower than the outer corner.
- Now draw the inner circle for the lens of the eye. Then draw the upper and lower eyelid, the eyebrow and the eyelashes.
- Slowly bring down a curvy line to draw the nose.
- Now the sharp curvy bottom shaped a bit like a triangle for the beard.
- Sharpen the detailing of the posture in the face with the help of curvy lines.
- For coloring the face:
- In the coloring process, firstly use a tint pencil color to brighten the detailed parts of the face.
- Now use a black/brown/red sketch pen for the outlines near the nose, eyes, eyebrow. Then use a flesh tint pencil color for the forehead, cheeks and nose area.
- Detail the hair and beard part with a black/blue/brown crayons with curvy lines.
- Color the collar part with a blue crayon.
- Finally to give it a sharply detailed structure use the flesh tint color wax crayon to highlight the facial part.
Reference: Various.


Very buti fulll
ReplyDelete